Foreword
If you encounter any problems in the package, have anything you would like to clarify, or would like to report a bug, please contact us at terresquall.com/contact.
Need help with setting up your Virtual Joystick, or want to report a bug? Please make a post on our dedicated forum for this asset pack.
Table of Contents
1. Version Changelogs
Version 1.1.6 (26 June 2025)
- Added a warning when the virtual joystick pivot is off centre.
- Added a button to recentre the pivot.
Version 1.1.5 (8 June 2025)
- Added handles to the Boundaries under Snaps To Touch, so that it is now easier to use.
- Optimised Editor code for newer Unity versions.
- Made the joystick code modular, so that we can easily add additional scripts to the class to extend its functionality.
Version 1.1.4 (unreleased)
- The joystick now works in all canvas rendering modes (Screen Space / Camera Space / World Space).
Version 1.1.3 (27 February 2025)
- Made a few optimisations with the pre-processor directives for determining whether to use the old or new input system.
- Fixed an issue that could cause the script to not compile if you have the new input system enabled.
- Added a tooltip and some Console notifications when you put your joystick on Canvases that do not use Screen Space - Overlay.
Version 1.1.2 (25 February 2025)
- Patched an issue with the new input system on mobile that caused it to be unusable, as the joystick will constantly be trying to read mouse input whenever there are no touches on screen.
- Used a pre-processor directive in the
VirtualJoystickEditorscript so that the pack uses the newerFindObjectsOfType()function in Unity 2022 and above.
Version 1.1.1 (10 February 2025)
- Patched an issue with the last version (v1.1.0) that made it unusable with the old input system.
- Added a new section in the FAQ to address fixing
InvalidOperationExceptionerrors in your project.
Version 1.1.0 (24 November 2024)
- The Virtual Joystick now supports the new Input System, and it will automatically switch between using the old or new Input System depending on your Project Settings.
Version 1.0.8 (8 October 2024)
- Fixed an obscure bug that occurs when you use
GetAxisRaw()with 2 arguments (e.g.GetAxisRaw("Horizontal", 1), where the specified joystick will always be ignored and you will always get the first joystick in your Scene. Thanks to Kaan Gül for pointing this out, and Kyle for recreating the buggy situation to help find the root cause of this issue!
Version 1.0.7 (27 September 2024)
- Fixed a couple of bugs with Version 1.0.6 that made it impossible to use the joysticks, as the IDs for all the joysticks would keep changing when you are working in the Editor.
- Removed the Reassign All IDs button, as it would change the IDs of your existing joysticks with unique IDs as well.
- Improved the error messages on the Console and on the joystick component for various setup issues in the project.
- Improved the layout of this user guide, and added a link to our support forums.
Version 1.0.6 (27 September 2024)
- Bugfix patch to change the way that multiple joysticks are handled, as there was an issue with the old system where there was no reliable way to get input from a specific joystick.
- For example, if you use
GetAxis("Horizontal", 1)to get input from the 2nd Joystick in your Scene, the 2nd joystick will not always be the same joystick across different devices, as the ordering of GameObjects can sometimes differ across devices. - This is why we have created a new ID attribute to uniquely identify every joystick.
- For example, if you use
- Every joystick now has a new ID attribute. This attribute must be unique when you have multiple joysticks on the Scene, and the ID will be used to retrieve input from the joystick.
Version 1.0.5 (11 July 2024)
- Fixed an issue with
GetAxisRaw()where moving your joystick left or right will sometimes register the up / down inputs as well. - Added a warning message on the Console when you are trying to get joystick input without any joysticks in your Scene.
- Added a non-static version of
GetAxisRaw()that returns aVector2value containing values from both axes.
Version 1.0.4 (16 June 2024)
- The Increase / Decrease Size buttons on the Virtual Joystick Inspector now increase and decrease the size of all children, so if you have complex joysticks that have multiple image components, it is easier to adjust the sizes of your joystick.
- The Snaps To Touch property now works in the Joystick. When it is disabled, the Boundaries attribute will be hidden and always return 0.
- The Edge Snap property has been rewritten to work properly now. It previously had a bug where it would always be on if the Directions attribute was non-zero. The description of this property has also been updated.
- Reworked the selection interface for the Virtual Joystick so that the Directions and Deadzone properties will show up when you select the Joystick.
- Added a new property Angle Offset that shows up if Directions is greater than 0. This allows you to rotate the Directions on the joystick, so that we can create different joystick shapes.
- Hidden the Script property on the Virtual Joystick component.
- Added a Horizontal Joystick prefab, which is only able to move horizontally.
- Improved the gizmo for the Radius property that shows up when you select the joystick on the Scene view, and added a new gizmo for the Deadzone and Directions properties.
Version 1.0.3 (2 June 2024)
- Removed the dependency on the Unity Event System and the Standalone Input Module. The joystick will now work without an Event System on the Scene.
- With the above change, the Joystick is no longer reliant on your Event System having a Standalone Input Module. So if you replace that with the new
InputSystemUIInputModulefrom Unity's new Input System, the Joystick will now continue working, as long as you have not disabled the old Input system. - Fixed an issue with the joystick that may cause it to become unresponsive under certain setups. The Virtual Joystick should be more sensitive now, especially to touches on mobiles or tablets.
- Added various notifications on the Inspector when the Virtual Joystick is not implemented correctly:
- Added an error notification on the Virtual Joystick Inspector if the new Unity Input system is installed, and the old input system is turned off, as the joystick currently doesn't work with the new Unity Input system.
- Fixed an issue in the Inspector for the Virtual Joystick where, if a Control Stick is not assigned for it, selecting the Virtual Joystick will constantly produce a
NullReferenceException. This has been replaced with a note in the Inspector reminding the user to assign a Control Stick instead. - Added a warning on the Virtual Joystick Inspector if your Joystick is not assigned to a Canvas.
- The joystick will now automatically disable itself and print a message on the Console when:
- It is not parented to a Canvas
- The old Input system is not enabled
- A couple of existing methods and properties in the
VirtualJoystickscript has been changed, to make it easier for other components to interface with it:- A new function,
GetAxisDelta(), has been added. The function returns aVector2expressing the change in the axis's position from the last frame to the current frame. - The
GetAxis()andGetAxisRaw()functions can now be called on an instance of a joystick. This will make it easier for you to code components that interface with it. - A couple of
privateandprotectedproperties have had their access modifiers changed tointernalinstead. This makes them accessible to other components, allowing the possibility of coding extensions for the Virtual Joystick component.
- A new function,
- Various sections of the guide have been updated to reflect the new features and changes that have been added.
Version 1.0.2 (3 April 2024)
- Removed the UI Text Print Axis property, which showed the axis of a joystick if you assigned a
UnityEngine.UI.Textobject to it. The removal is because newer versions of Unity only support Text Mesh Pro, and the console debug option was improved. - Improved on the Console Print Axis property. Now, it shows the name of the joystick that is producing the output; and the output only generates if you are using the joystick.
- Fixed an issue where, before it is first used, a joystick may point to (or away from) the Anchor on certain Canvases that have a scale factor that is not 1, until they are used for the first time.
- Fixed an issue where resizing the screen would cause the joystick to become deformed. Now, the joysticks will recalculate their positions whenever the screen size changes (e.g. phone rotation).
- Fixed the code blocks not showing properly on the user guide.
- Added some FAQs.
Version 1.0.1 (22 March 2024)
- Fixed an issue that caused the asset to throw errors when you try to build the project.
- Added dependency on UI and the old Text element to maintain compatibility with newer versions of Unity.
Version 1.0.0 (3 December 2023)
- Limited initial release.
2. Setting up
Import the asset into your project. The asset should be unpacked into a folder called VirtualJoystick in your Assets folder.
a. Adding a Joystick
To add and use a virtual joystick, drag any of the joystick prefabs from VirtualJoystick/Prefabs onto any Canvas GameObject in your Scene, and it should be ready to use.
Please make sure that the Canvas you are attaching the joystick to has Screen Space - Overlay set in its Render Mode field. If you do not have any Canvases that match this requirement, you will need to add another Canvas exclusively for the joystick(s) you want to add.
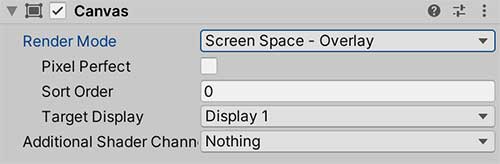
Otherwise, you will get buggy behaviour with your joystick, or it will not work entirely.
b. Unity Input system settings
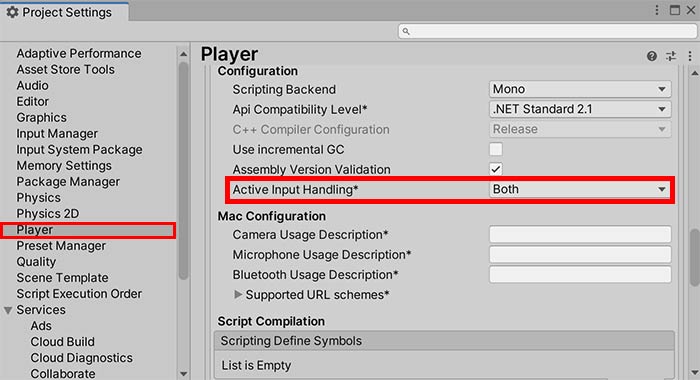
Since v1.1.0, the Virtual Joystick works with both the old Input Manager system and the new Input System. It will also automatically default to using the old Input system, unless you explicitly set the Active Input Handling setting under Player Settings > Player to use the new Input System Package.
When both input handling systems are enabled, Virtual Joystick defaults to the old Input Manager system to maximise compatibility with Unity Remote. Hence, if you are using Unity Remote to test your projects, be sure to set the Active Input Handling to Both.
If you are using an older version of the Virtual Joystick (before v1.1.0), you will receive an error message on your Virtual Joystick if the old Input System is not enabled.
c. Assigning unique IDs
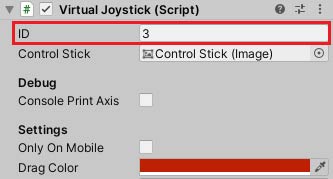
As of Version 1.0.6, every joystick comes with an ID attribute. This attribute will need to be unique for every joystick in the Scene, as it is the ID that you will have to use to read the joystick's input.
If your ID is not unique, a warning will be shown on your joystick. Click on the button below the warning, and a unique ID will automatically be assigned to your Virtual Joystick.
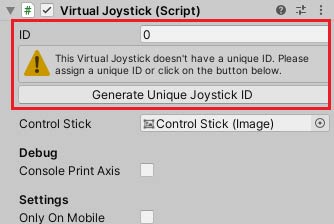
If the ID attribute is not on your joystick, please update your asset to the latest version, as versions before 1.0.6 are unable to reliably retrieve input from the same joystick across different devices.
3. Reading joystick input
Once the joystick is set up, in every script where you want to read input from any of your virtual joysticks, you will need to add the following namespace to the top of your scripts:
using Terresquall;
Once that is done, you will be able to access the VirtualJoystick class.
a. Using GetAxis()
To read input from the joystick, use VirtualJoystick.GetAxis("Horizontal") to read horizontal offset, and VirtualJoystick.GetAxis("Vertical") to read vertical offset. For example, the following code moves the character in the horizontal direction the joystick is pushed:
// The value of x is between -1 and 1.
float x = VirtualJoystick.GetAxis("Horizontal");
transform.position += x * Time.deltaTime;
The function works similarly to Unity's own Input.GetAxis() method. Do note, however, that the "Horizontal" and "Vertical" prompts are hardcoded into the joystick and are unrelated to the values in Unity's Input Manager.
From Version 1.0.3 onwards, you can also call GetAxis() on an instance of a joystick.
b. Using GetAxisRaw()
If you want to snap the values to -1, 0 or 1, you can also use VirtualJoystick.GetAxisRaw("Horizontal") or VirtualJoystick.GetAxisRaw("Vertical"), which functions like Unity's own Input.GetAxisRaw().
c. Using GetAxis() or GetAxisRaw() without arguments
If you don't like to retrieve each axis separately, you can also call VirtualJoystick.GetAxis() without any arguments to retrieve a Vector2 containing the horizontal and vertical inputs.
Vector2 joyInput = VirtualJoystick.GetAxis();

// Moves the character with the joystick.
transform.position += joyInput.x * Time.deltaTime;
From Version 1.0.3 onwards, you can also call GetAxisRaw() on an instance of a joystick.
d. Reading multiple joysticks
If you have multiple virtual joysticks on the Scene, you will need to make sure every Joystick has a unique ID assigned to them.
Then, to access input from the joystick, use the assigned ID in your GetAxis() or GetAxisRaw() calls to access input from that specific joystick.
// Reads the horizontal input of the joystick with an ID of 2.
VirtualJoystick.GetAxis("Horizontal", 2);
// Reads the vertical input of the joystick with an ID of 3.
VirtualJoystick.GetAxis("Vertical", 3);
If you want to retrieve input data for both axes, just pass the integer value of the joystick, like so:
// Gets the input data of the joystick with an ID of 3.
VirtualJoystick.GetAxis(3);
If the ID attribute is missing, please update the asset pack and ensure that it is above Version 1.0.7. Versions before 1.0.7 are unable to reliably retrieve input from the same joystick across different devices.
You are also recommended to avoid using the GetAxis() and GetAxisRaw() methods without specifying an ID when you have multiple joysticks, to avoid having potential input issues.
VirtualJoystick.GetAxis("Horizontal"); // Avoid doing this. e. Using GetAxisDelta()
If you want to find the change in the axis of the joystick from the last frame to the current frame, you can use the following code:
Vector2 delta = VirtualJoystick.GetAxisDelta();
If you have multiple joysticks on the screen, you can also pass an integer to the function to get your nth joystick. The first joystick has an index of 0, so if you want the delta of the 2nd joystick:
Vector2 delta = VirtualJoystick.GetAxisDelta(1);
You can also call the function on an instance of your joystick:
VirtualJoystick vj = FindObjectOfType<VirtualJoystick>();
Vector2 delta = vj.GetAxisDelta();
Do note that, since the magnitude of GetAxisDelta() is affected by frame rate, if you want use it to judge how fast the joystick is moving, you should be dividing the resulting vector by Time.deltaTime first.
Vector2 delta = VirtualJoystick.GetAxisDelta() / Time.deltaTime;
4. Settings
On top of this, each virtual joystick also comes with a Virtual Joystick component, which has a variety of settings you can toggle.
a. Settings summary
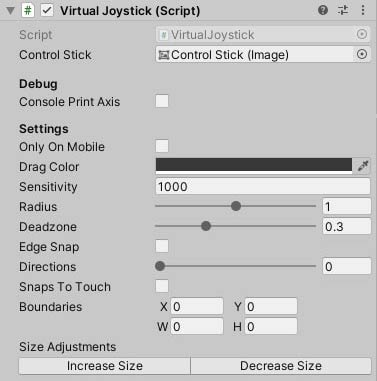
To adjust how the Virtual Joystick works, you will want to adjust the attributes under the Settings section. Below are a list of the properties, and what they do:
| Property | Description |
|---|---|
| Only On Mobile | Check this box if you want to hide the Virtual Joystick when the game is not being played on a mobile device. Only works on Unity 2020 and above. Works with the Device Simulator in Unity. |
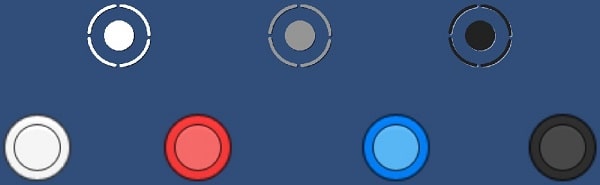
| Drag Color | What the color of the joystick turns into when you are tapping on it. Used to provide feedback when using the joystick. |
| Sensitivity | This controls how responsive the joystick is. |
| Radius | This controls how far you can pull the control stick on the joystick away from the joystick base at the centre. When adjusting this, a red circle will be shown on the joystick, showing you how big this radius is. |
| Deadzone | A value between 0 and 1, representing a percentage of the maximum distance the joystick can travel. For example, if this value is 0.3, you will need to pull the joystick at least 30% away from the centre for the input to register. |
| Edge Snap | When active, the joystick automatically snaps to the edge when it is outside of the Deadzone. |
| Directions | If more than 0, the joystick will only be able to move in specfic directions. For example, if set to a value of 4, the joystick can only move in ↑ ↓ ← →. Set it to 8, and it can only move in ↑ ↗ ← ↘ ↓ ↙ ← ↖. |
| Angle Offset | Only available when Directions is more than 0. Allows you to set the angle that the Directions are aligned to, so that with 4 directions, the joystick can be configured to move in ↗ ↘ ↙ ↖ instead of the default directions. |
| Snaps To Touch | This works together with the Boundaries attribute. When checked, the joystick will teleport to wherever your finger is, as long as they are within the boundaries set. |
| Boundaries | Only available when Snaps To Touch is activated. If a finger is tapped within the bounds denoted (in the Editor, this is a yellow box around the joystick), Snaps To Touch will occur. |
| Size Adjustments | For adjusting the size of the joystick, use the buttons here to make your life easier, as there is a child element inside the joystick that you have to scale up as well. |
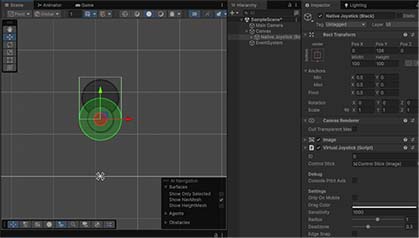
b. Boundaries setting
In the joystick settings within the Inspector, there is an option called Snap to Touch.
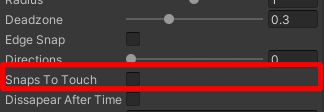
Once enabled, a new section called Boundaries will appear below it. This section allows you to customize the boundary using values for X, Y, Width, and Height. Use X and Y to adjust the boundary's position, and Width and Height to change its size.

Alternatively, you can edit the boundary directly in the Scene view.
To do this, first select the joystick GameObject in the Hierarchy. Make sure that both the Width and Height values are greater than 0, otherwise the boundary will not be visible.
Once selected, you'll see three handles (dots) on the boundary — one in the top right, one in the bottom left, and one in the center. You can click and drag these handles to modify the boundary:
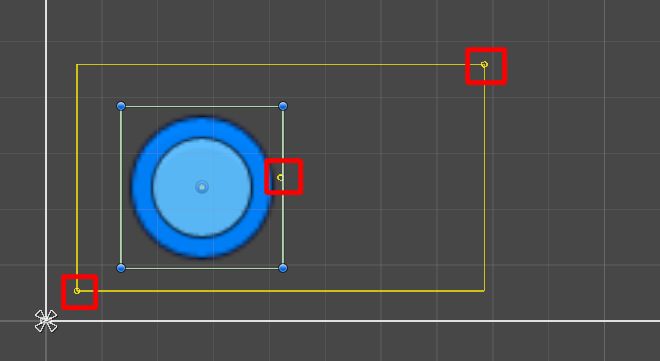
- Corner handles (top right and bottom left) allow you to resize the boundary (adjusting Width and Height).
- Center handle lets you move the entire boundary (adjusting X and Y).
5. FAQs
Before you read the rest of this FAQ, make sure you update your Virtual Joystick package on your project first.
My project can't export after I import this asset. What do I do?
Please update your Virtual Joystick package. If you are using Version 1.0.1 or below, there is a bug that prevents you from being able to export your project.
When I use GetAxisRaw(), when I move towards the left or right directions, the joystick still detects upward movement!
If this happens, please update your Virtual Joystick package and make sure you are using Version 1.0.5 and above.
Also, make sure that your Deadzone is set above 0.
The Joystick is not showing up when I drag it onto a Scene! What do I do?
If it is not showing up, that's because it wasn't parented to a Canvas. If you put it onto the Scene without parenting it to a Canvas, it won't work! You will also get the following warning on your Joystick component:
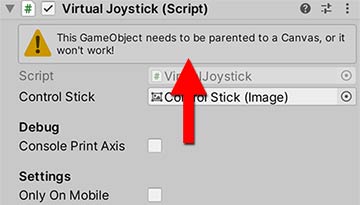
To fix this, make sure you always parent your Virtual Joystick GameObjects under your Canvas.
Now the Joystick is showing up, but it is not responding when I tap or drag it!
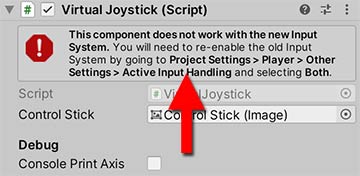
If your Joystick is not responding to your interaction, check to see if there are any warning or error messages on the component in the Inspector. If you see the following error message:
That means you have Unity's new Input system installed on your project, and you have configured it to disable the original Input system. To get the joystick working again, you will need to either:
- Update your Virtual Joystick Pack to the latest version (any version above v1.1.0), or;
- Turn on the old Input system as well, by heading to Edit > Project Settings. Under the Window that pops up, go to the Player tab, open the Other Settings subwindow, and find the Active Input Handling dropdown. Then, set its value to Both
The Joystick is still not responding to my input.
After trying all the tips above, if your joystick is still unresponsive, try resetting your Virtual Joystick component.
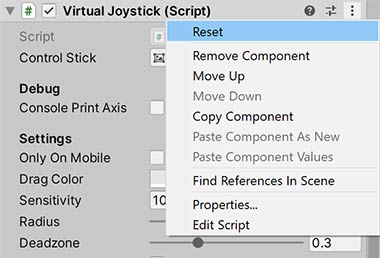
You might have gotten some of the configurations wrong (e.g. if you set Sensitivity to 0, the joystick will also stop responding to player input).
Alternatively, you can also visit our dedicated forums for this asset pack and ask us for more help.
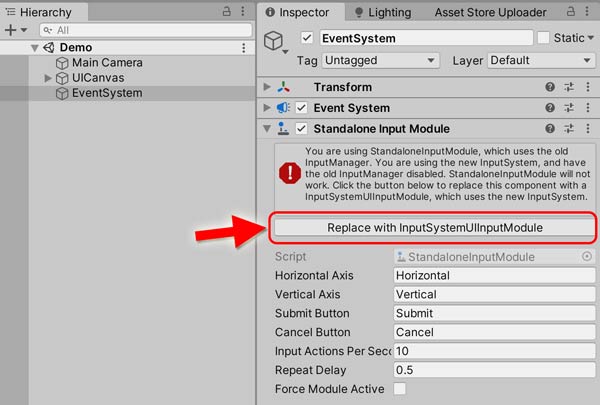
I'm getting an InvalidOperationException error, saying I am trying to read Input using the UnityEngine.Input class.
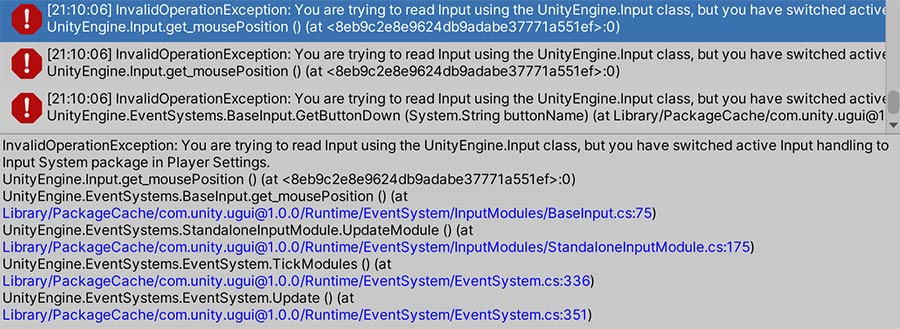
InvalidOperationException error.This means that you have switched over from the old Input system to the new one, but have not updated your EventSystem GameObject to use the new Input system.
Select your EventSystem GameObject, and click on the Replace with InputSystemUIInputModule button.
The Control Stick of my joystick is disappearing / jumping too far away from the centre when I launch the game!
Please ensure that you put your joysticks on a Canvas with Screen Space - Overlay. Joysticks on any other Canvases do not work, and will cause the joystick to be buggy or non-functional.
I have a namespace error that I don't know how to fix. This is what the error says: The type or namespace name 'InputSystem' does not exist in the namespace 'UnityEngine'.
If after installing the Virtual Joystick, you get the error above, it means that you have enabled the new Input System in your Player Settings without installing the Input System package.
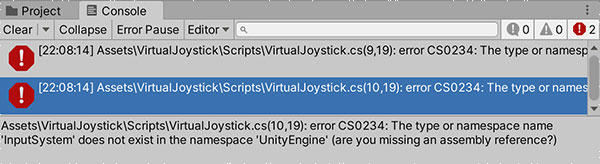
To fix this, you will need to go to Window > Package Manager and install the Input System package.
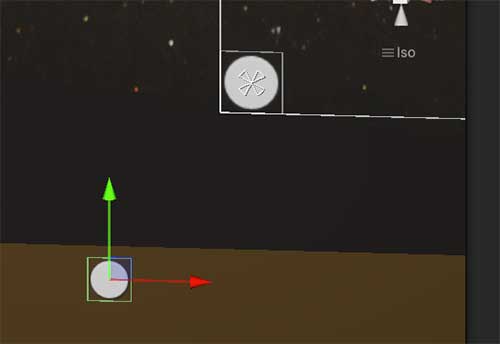
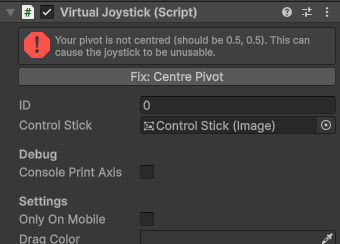
My jostick is stuck a certain direction after using alt + shift to set the anchor for the virtual joystick
This happens because using Alt + Shift to set the anchor position also offsets the pivot position, causing the joystick to be off-center as well.
To fix this, a button labeled "Fix: Centre Pivot" will appear in the Inspector whenever the pivot is detected to be off-center. Simply click it, and the pivot will be re-centered.
Alternatively, you can also visit our dedicated forums for this asset pack and ask us for more help.
6. Credits
The following people have contributed to this asset pack:
- Terence Pek: Created the core asset and manages the project.
- Kiefer Neo: Responsible for most of the awesome Virtual Joystick Inspector UI.
- Joseph Tang: Worked on some stuff for this asset pack that has not been released yet!
- Barrientos Kyle: Made this asset compatible with the new Input System (patch will be released soon), and helped to fix a pesky bug.
- Yip Si Yuan: Fixed a bug with the Canvas and added a few usability features to the project.
The following people reported bugs with older versions of the asset package. Please help us report any bugs you find in our forums, to help us further improve this asset pack for everyone!
- Kaan Gül: Finding a bug in v1.0.5 with
GetAxisRaw()that caused it to work only with the first joystick in the Scene. - Aaron Asher Wong: Discovering that v1.1.0 did not work with Unity projects that used only the old Unity input system in the Project Settings (see Version 1.1.1).
- Juan Delgado Salmerón: Reported an issue with the new input system not working on mobile devices, as the code kept trying to read mouse input on mobile (see Version 1.1.2).
- Rozalia: Highlighted an issue with the joystick not working on Canvases that do not have Screen Space - Overlay (see Version 1.1.3).