
Table of Contents
- Version History
- Introduction
- Saving and Loading for
PersistentObject - Bench API
- Setting Up the UI
- Setting Up the Save Indicator
- Configuring Settings and Debugging
- Credits
Version History
This section tracks the major updates and changes to the Bench Universal Save System.
Version 0.2.1 (6 March 2026)
- Fixed an issue where the Bench Save window was not able to create a Bench Settings file for you when you clicked on the button.
- If you fail to create a new Bench Settings file through the Bench window, it now shows you an error message to tell you what's wrong.
- It is now possible to create new Bench Settings files in the Project window through Right-click > Create > Bench Universal Save System > Settings.
- Added a new error notification that shows up on the Bench Settings Inspector if you have multiple Bench Settings file in your project. This notification comes with a button that automatically helps you to delete the file as well.
Version 0.2.0 (27 February 2026)
- Overhauled the user guide to make it easier to understand.
- Added Inspector notification that shows up when you are reading a save slot with corrupted data.
- Added new functions
Bench.Read()andBench.ReadAndFind()to make it easy to read data on individual PersistentObjects. - Added a new
Bench.QuickLoad()overload that loads only a single PersistentObject. - Added a
Bench.ReadSaveFile()function that loads a save file without saving it into the cache. - Improved display of saved data on the Bench Universal Save System Inspector window.
- Every PersistentObject now shows any saved data that it has when it is selected. This will make it much easier to review saved data.
Version 0.1.0 (20 October 2025)
- Initial release of the Bench Universal Save System
- Core save/load functionality with PersistentObject class
- Multiple save slot support
- Native Save UI Canvas with customizable slots
- Save indicator UI element
- Async save/load operations
- Quick save/load for cached data
1. Introduction
The Bench Universal Save System is a Unity Asset that was originally developed for the Creating a Metroidvania (like Hollow Knight) tutorial series by Terresquall. Because the Save System got very complicated and robust, we thought that it would be a good idea to turn it into a Unity Asset instead.
Because of the complexity of setting up a saving system in a video game, we wanted to create an asset that is very easy to set up, so that you can get the system up and running as quickly as possible.
a. The 5-Minute Summary
Bench is a save system that is designed to be easy to set-up and use. To begin using Bench to save your data:
- Have your script inherit from
Terresquall.PersistentObjectinstead ofUnityEngine.MonoBehaviour.using Terresquall; using UnityEngine; public class MyUnityScript :
MonoBehaviourPersistentObject { ... }
- This will introduce a Save ID attribute to your component. Once this attribute is filled up, your objects will automatically be saved whenever you call
Bench.SaveGame().
Component with a successfully generated SaveID attribute
- Whenever you call
Bench.SaveGame()in your code, all components inheriting fromPersistentObjectwith an assigned Save ID attribute will automatically be saved. If you would like to save to different slots, useBench.SaveGame(slotNumber), whereslotNumberis any integer. If you do not specify a slot, the game automatically saves to slot 0.Bench.SaveGame(); // Saves game to slot 0. Bench.SaveGame(2); // Saves game to slot 2.
- To load a game, call
Bench.LoadGame()when an existing Scene is running. This will cause Bench to load saved data into all components that have Save IDs corresponding to the data in the save file. To load data from a specific slot, specify the slot number just like you would when you are saving, withBench.LoadGame(slotNumber).Bench.LoadGame(); // Load game data from slot 0. Bench.LoadGame(2); // Load game data from slot 2.
b. Defining Save Logic
Before you start testing out saving will start working, however, you will also need to specify how each of your objects are saved, which is covered in the next section.
2. Saving and Loading for PersistentObject
After inheriting your class from PersistentObject as shown above, you will need to implement 3 other things in your class before your saves start working.
- A nested
SaveDataclass that inherits fromPersistentObject.SaveDatato provide structure for the data that will be saved. - A
Save()method describing how data is stored in yourSaveDataobject, wheneverBench.SaveGame()is called. - A
Load()method describing how saved data fromSaveDatashould be restored back to your component whenBench.LoadGame()is called.
a. Basic Setup
Below is an example demonstrating this. The 3 items above are highlighted below:
using Terresquall;
using UnityEngine;
public class Player : PersistentObject {

    public int health;
    public int maxHealth;
    public int level;

    // Other code...

    // Defines what are the variables in the save object of this class.
    [System.Serializable]
    public new class SaveData : PersistentObject.SaveData {
        public int health;
        public int maxHealth;
        public int level;
    }

    // Defines how the variables will be saved into SaveData.
    // If the save is successful, we must return the SaveData object.
    public override PersistentObject.SaveData Save() {

        if (CanSave()) {
            // We want to save the level, maxHealth and position, not the current health.
            return new SaveData
            {
                saveID = saveID, // You always need to save the save ID.

                health = health,
                maxHealth = maxHealth,
                level = level
            };
        }

        return null;
    }

    // Defines how the variables will be loaded into our object.
    // Return true if data is successfully loaded, or false otherwise.
    public override bool Load(PersistentObject.SaveData data) {
        if (data == null) return false;

        health = data.health;
        level = data.level;
        maxHealth = data.maxHealth;

        return true;
    }
}
b. Saveable Data
Note that because of the way persistent data (i.e. save data) works, not all variable types can be saved. This is not something that our asset can control — it isn't even something that Unity or Microsoft can fully-control, as there are differences in the way persistent data is stored compared to the way component data is stored.
Because of the complexity behind saving, it is also difficult to provide a list of all saveable types. For starters, all C# types that support literals can be saved without issue: bool, byte, sbyte, short, ushort, int, uint, long, ulong, char, float, double, decimal, string.
Any custom type (i.e. classes or structs) that has the [System.Serializable] attribute can also be saved, although most common Unity components such as Transform, GameObject and Rigidbody cannot be saved.
To save Unity components or objects, you will need to define and extract the values that you want to save.
using Terresquall;
using UnityEngine;
public class Ball : PersistentObject {
    Rigidbody rb; // We cannot store the whole Rigidbody.

    // Other code...

    [System.Serializable]
    public new class SaveData : PersistentObject.SaveData {
        // Store the Rigidbody's mass and gravityScale.
        public float mass;
        public float gravityScale;
    }

    public override PersistentObject.SaveData Save() {

        if (CanSave()) {
            return new SaveData
            {
                saveID = saveID, // You always need to save the save ID.
                mass = rb.mass,
                gravityScale = rb.gravityScale
            };
        }

        return null;
    }

	public override bool Load(PersistentObject.SaveData data) {
        if (data == null) return false;

        rb.mass = data.mass;
        rb.gravityScale = data.gravityScale;

        return true;
    }
}
c. Using C# Properties
If the method above is cumbersome for you, you can also use C# properties to make it easier to handle your Save() and Load() functions:
using Terresquall;
using UnityEngine;
public class Doodad : PersistentObject {


    // We want to save the position and rotation of the object,
    // but Vectors and Quarternions cannot be saved directly.
    // Hence, we need to break the values down into primitives.
    [System.Serializable]
    public new class SaveData : PersistentObject.SaveData {
        public float posX, posY, posZ;
        public float rotW, rotX, rotY, rotZ;

        // We will use properties to make assignment easier.
        public Vector3 position {
            get { return new Vector3(posX, posY, posZ); }
            set {
                posX = value.x;
                posY = value.y;
                posX = value.z;
            }
        }

        public Quaternion rotation {
            get { return new Quaternion(rotX, rotY, rotZ, rotW); }
            set {
                rotW = value.w;
                rotX = value.x;
                rotY = value.y;
                rotX = value.z;
            }
        }
    }

    public override PersistentObject.SaveData Save() {

        if (CanSave()) {
            return new SaveData
            {
                saveID = saveID, // Now saving is much easier.

                position = transform.position,
                rotation = transform.rotation
            };
        }

        return null;
    }

    // Defines how the variables will be loaded into our object.
    // Return true if data is successfully loaded, or false otherwise.
    public override bool Load(PersistentObject.SaveData data) {
        if (data == null) return false;

        transform.position = data.position;
        transform.rotation = data.rotation;

        return true;
    }
}
3. Bench API
The Bench class is the core of the save system. All of its methods are static, so you can call them from anywhere without needing a reference to a Bench instance. Below is a full reference of every public method, split into two groups.
a. Save & Load Functions
Besides Bench.SaveGame() and Bench.LoadGame(), Bench contains other functions that allow you to save and load data in different ways.
| Bench.SaveGame() | ||
|---|---|---|
Collects data from all active PersistentObject instances in the scene, then writes it to disk in the specified save slot. If no slot is given, saves to currentSlot. Pass reprocessSave = false to skip re-collecting scene data and write whatever is already in the cache. | ||
| Signatures | void SaveGame(bool reprocessSave) void SaveGame(int id = -1, bool reprocessSave = true) | |
| Parameters | id | The save slot to write to. Defaults to currentSlot when omitted or negative. |
| reprocessSave | When true, calls QuickSave() first to refresh the cache from the current scene. When false, writes whatever is already cached. | |
| Returns | void | |
| Example | // Save to the current slot, re-collecting all scene data. Bench.SaveGame(); // Save to slot 2 without re-collecting (write cached data as-is). Bench.SaveGame(2, false); | |
| Bench.SaveGameAsync() | ||
|---|---|---|
Asynchronous version of SaveGame(). Writes to disk without blocking the main thread. Automatically toggles the SaveIndicator on at the start of the operation and off when it completes. | ||
| Signatures | async void SaveGameAsync(bool reprocessSave) async void SaveGameAsync(int id = -1, bool reprocessSave = true) | |
| Parameters | id | The save slot to write to. Defaults to currentSlot when omitted or negative. |
| reprocessSave | When true, refreshes the cache from the current scene before writing. When false, writes whatever is already cached. | |
| Returns | void | |
| Example | // Async save to the current slot, re-collecting all scene data. Bench.SaveGameAsync(); // Async save to slot 1 without re-collecting scene data. Bench.SaveGameAsync(1, false); | |
| Bench.QuickSave() | ||
|---|---|---|
Collects save data from PersistentObject instances and stores it in the in-memory cache. Does not write to disk. Pass a specific target or array of targets to update only those objects in the cache; omit it to refresh the cache from all active PersistentObject instances in the scene. | ||
| Signatures | SaveFile QuickSave(PersistentObject[] targets = null) SaveFile QuickSave(PersistentObject target) | |
| Parameters | targets / target | The PersistentObject(s) to collect data from. When omitted or null, all active PersistentObject instances in the scene are used. |
| Returns | SaveFile — the updated in-memory cache. | |
| Example | // Snapshot all PersistentObjects into the cache. Bench.QuickSave(); // Snapshot only the player into the cache. Bench.QuickSave(player); // Snapshot a specific set of objects into the cache. Bench.QuickSave(new PersistentObject[] { player, chest, door }); | |
| Bench.QuickSaveAsync() | ||
|---|---|---|
Asynchronous version of QuickSave(). Yields before collecting data so the main thread is not blocked. When called with an array (or no argument), also toggles the SaveIndicator on and off around the operation. | ||
| Signatures | async Task<SaveFile> QuickSaveAsync(PersistentObject[] targets = null) async Task<SaveFile> QuickSaveAsync(PersistentObject target) | |
| Parameters | targets / target | The PersistentObject(s) to collect data from. When omitted or null, all active PersistentObject instances in the scene are used. |
| Returns | Task<SaveFile> — the updated in-memory cache, once the async operation completes. | |
| Example | // Async snapshot of all PersistentObjects; await the result. SaveFile cache = await Bench.QuickSaveAsync(); // Async snapshot of a single object. await Bench.QuickSaveAsync(player); | |
| Bench.FormatSave() | ||
|---|---|---|
Serialises a SaveFile into a MemoryStream ready to be written to disk. Also populates the file's metadata (timestamp, playtime, scene name, etc.) and fires the OnFormatSave event, giving other scripts the opportunity to modify the data before it is written. | ||
| Signature | MemoryStream FormatSave(SaveFile file = null) | |
| Parameters | file | The SaveFile to serialise. Defaults to the current in-memory cache when omitted or null. |
| Returns | MemoryStream containing the serialised save data, or null if no valid save file is available. | |
| Example | // Hook into OnFormatSave to inject custom metadata before writing. Bench.OnFormatSave += (SaveFile file) => { file.metadata["checksum"] = ComputeChecksum(file); }; // Serialise the current cache into a stream, then write it yourself. MemoryStream stream = Bench.FormatSave(); if (stream != null) { // Use the stream for custom upload or encryption logic. } | |
| Bench.LoadGame() | ||
|---|---|---|
Reads a save file from disk into the in-memory cache, then immediately calls QuickLoad() to apply the data to all matching PersistentObject instances in the current scene. Also sets currentSlot to the loaded slot so that subsequent saves go to the same slot. | ||
| Signature | SaveFile LoadGame(int id = 0) | |
| Parameters | id | The save slot to load from. Defaults to slot 0. |
| Returns | SaveFile — the loaded save data, or null if no save file exists for that slot. | |
| Example | // Load from the current slot when the scene starts. void Awake() { Bench.LoadGame(Bench.currentSlot); } // Load from a specific slot and check if it succeeded. SaveFile result = Bench.LoadGame(2); if (result == null) Debug.Log("No save found in slot 2."); | |
| Bench.QuickLoad() | ||
|---|---|---|
Applies data from the in-memory cache to PersistentObject instances in the scene. Does not read from disk — call LoadGame() or ReadSaveFile() first to populate the cache. Pass a specific target to restore only that object; omit it to restore all active PersistentObject instances. | ||
| Signatures | bool QuickLoad(PersistentObject[] targets = null) bool QuickLoad(PersistentObject target, StringBuilder debugOutput = null) | |
| Parameters | targets / target | The PersistentObject(s) to restore. When omitted or null, all active PersistentObject instances in the scene are restored. |
| debugOutput | (Single-target overload only) An optional StringBuilder to append debug information to during the load. | |
| Returns | bool — true if data was successfully applied, false if the cache is empty or no matching save data was found for the target. | |
| Example | // Apply cached data to all PersistentObjects in the scene. Bench.QuickLoad(); // Apply cached data to only the player object. Bench.QuickLoad(player); // Apply cached data with debug output collected into a StringBuilder. StringBuilder log = new StringBuilder(); Bench.QuickLoad(player, log); Debug.Log(log.ToString()); | |
| Bench.ReadSaveFile() | ||
|---|---|---|
Deserialises and returns the SaveFile for the given slot directly from disk, without applying any data to scene objects. Useful for inspecting save data without disturbing the current game state. | ||
| Signature | SaveFile ReadSaveFile(int slot) | |
| Parameters | slot | The save slot to read from disk. |
| Returns | SaveFile — the deserialised save data, or null if the file does not exist or cannot be read. | |
| Example | // Read slot 2 from disk to inspect its data without loading it.
SaveFile file = Bench.ReadSaveFile(2);
if (file != null) {
foreach (var entry in file.data)
Debug.Log(entry.saveID);
} | |
| Bench.Delete() | ||
|---|---|---|
| Permanently deletes the save file for the specified slot from disk and clears the in-memory cache. | ||
| Signature | bool Delete(int id) | |
| Parameters | id | The save slot to delete. |
| Returns | bool — true if the file was successfully deleted, false if it did not exist or could not be removed. | |
| Example | // Delete save slot 1 and confirm success.
bool deleted = Bench.Delete(1);
if (deleted) Debug.Log("Slot 1 cleared.");
else Debug.LogWarning("Could not delete slot 1."); | |
b. Utility Functions
| Bench.Find() / Bench.ReadAndFind() | ||
|---|---|---|
Find() searches the in-memory cache for the SaveData entry matching a given PersistentObject. ReadAndFind() does the same, but reads the save file for a specific slot from disk first — useful for inspecting a slot without changing currentSlot or the active cache. | ||
| Signatures | PersistentObject.SaveData Find(PersistentObject p) PersistentObject.SaveData ReadAndFind(PersistentObject p, int slot = 0) | |
| Parameters | p | The PersistentObject whose save data you want to locate. |
| slot | (ReadAndFind only) The save slot to read from disk. Defaults to slot 0. | |
| Returns | PersistentObject.SaveData — the matching entry, or null if none is found. | |
| Example | // Check the cache for existing save data for the player. PersistentObject.SaveData data = Bench.Find(player); if (data != null) Debug.Log("Found cached data for: " + data.saveID); // Read slot 2 from disk and find the player's entry without altering the cache. PersistentObject.SaveData slotData = Bench.ReadAndFind(player, 2); | |
| Bench.PeekGame() | ||
|---|---|---|
| Reads only the metadata block from a save file on disk using a lightweight XML reader, without deserialising the full object data. Suitable for quickly reading information like the save timestamp or scene name to display in a save slot UI. | ||
| Signature | Dictionary<string, string> PeekGame(int id) | |
| Parameters | id | The save slot to peek at. |
| Returns | Dictionary<string, string> containing the metadata fields (time, playtime, version, unity_version, current_scene_name), or null if no save exists for that slot. | |
| Example | // Display save slot info in a menu without fully loading the file.
Dictionary<string, string> meta = Bench.PeekGame(1);
if (meta != null) {
slotLabel.text = meta["current_scene_name"] + " — " + meta["time"];
} else {
slotLabel.text = "Empty";
} | |
| Bench.GetCurrentSaveFile() | ||
|---|---|---|
Returns the SaveFile currently held in the in-memory cache. | ||
| Signature | SaveFile GetCurrentSaveFile() | |
| Returns | SaveFile — the current cache, or null if nothing has been saved or loaded this session. | |
| Example | // Inspect the active cache without triggering a new save or load.
SaveFile current = Bench.GetCurrentSaveFile();
if (current != null)
Debug.Log("Cache has " + current.data.Count + " saved objects."); | |
| Bench.SlotHasSave() / Bench.CountSaves() | ||
|---|---|---|
Helper methods for checking the state of save files on disk. SlotHasSave() checks whether a specific slot has a save file. CountSaves() returns the total number of save files present in the save directory. | ||
| Signatures | bool SlotHasSave(int slot) int CountSaves() | |
| Parameters | slot | (SlotHasSave only) The slot number to check. If negative, falls back to currentSlot. |
| Returns | SlotHasSave: bool — true if a save file exists for that slot.CountSaves: int — the total number of save files in the saves directory. | |
| Example | // Only load if a save actually exists for the slot. if (Bench.SlotHasSave(Bench.currentSlot)) Bench.LoadGame(Bench.currentSlot); // Display how many save files the player has. Debug.Log("You have " + Bench.CountSaves() + " save(s)."); | |
| Bench.GetSavePath() | ||
|---|---|---|
Returns file system paths for the save directory or a specific save file. The base directory is derived from Application.persistentDataPath. | ||
| Signatures | string GetSavePath() string GetSavePath(int slot) | |
| Parameters | slot | (Second overload only) The slot number whose file path you want. |
| Returns | string — the save directory path (no arguments), or the full path to a specific slot's save file. | |
| Example | // Log the save directory location. Debug.Log("Saves stored at: " + Bench.GetSavePath()); // Get the full file path for slot 0. string path = Bench.GetSavePath(0); Debug.Log("Slot 0 path: " + path); | |
| Bench.FindObject<T>() / Bench.FindObjects<T>() | ||
|---|---|---|
Unity-version-safe wrappers around FindObjectOfType / FindObjectsOfType, handling the API differences introduced in Unity 2023.1. Used internally by Bench to locate PersistentObject instances, but available for use in your own code. | ||
| Signatures | T FindObject<T>(bool includeInactive = false) where T : Object T[] FindObjects<T>(bool includeInactive = false) where T : Object | |
| Parameters | includeInactive | When true, inactive scene objects are included in the search. Defaults to false. |
| Returns | FindObject: the first scene object of type T, or null.FindObjects: an array of all scene objects of type T. | |
| Example | // Find the first Player in the scene, including inactive objects. Player p = Bench.FindObject<Player>(true); // Find all Enemy instances currently active in the scene. Enemy[] enemies = Bench.FindObjects<Enemy>(); | |
| Bench.FindObjectBySaveID() | ||
|---|---|---|
Searches all PersistentObject instances in the scene (including inactive ones) and returns the first one whose Save ID matches the given string. The generic overload casts the result to the specified type before returning. | ||
| Signatures | PersistentObject FindObjectBySaveID(string saveID) T FindObjectBySaveID<T>(string saveID) where T : PersistentObject | |
| Parameters | saveID | The Save ID string to search for. |
| Returns | PersistentObject (or T) — the matching object, or null if none is found. | |
| Example | // Find any PersistentObject with a specific Save ID. PersistentObject obj = Bench.FindObjectBySaveID("chest_room2_01"); // Find and cast directly to a known type. Chest chest = Bench.FindObjectBySaveID<Chest>("chest_room2_01"); if (chest != null) chest.Open(); | |
4. Displaying Save Slots in Game
To display data in existing save slots in-game, you can use the prefabs in the Prefabs/Save Slots UI folder. Drag any one of them onto a Scene to begin using them.

a. Configuring the UI Save Slots
Before you begin to use the save slots, you are recommended to find the Save Slot Template GameObject within the prefab after dragging it out. There are a few settings you will need to adjust.

In the Save Slot Template GameObject, you should be able to find a component called UISaveSlot. Within it, there are a few settings you can adjust — the most important of these settings is the Default Scene property, which determines the Scene that is loaded by default when the slot is clicked on.

Once done, click on the Update Save Slots button, and the asset should automatically fill up the Scene GameObject with multiple save slots. 
Remember to add your main game scene into the Build Profile Scene List.
b. Setting the number of save slots
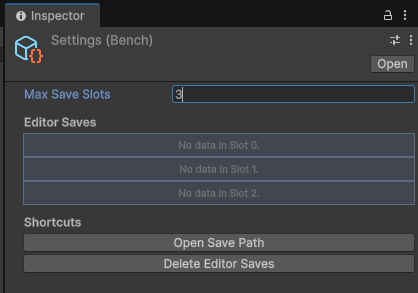
To control how many save slots your game accepts, go to Window > Terresquall > Bench Universal Save System to configure the asset's settings.
In the window, modify the Max Save Slots variable to control how many save slots are available. This will affect the number of save slots that are generated for the Save Slot UI prefab as well.
Next, in the UI Save Slot Manager component attached to the UI Save Slot Manager, click on the button Generate Save Slot Elements. This would create the specified number of Save Slot Template instances which duplicate all the settings from the original template.

With that, you have set up the UI and environment for saving to take place. To start a game and generate a new save, simply click on any of the UI save slots.
Do take note that you will have to call Bench.QuickLoad() after the data has been loaded into their respective PersistentObject instances. For optimisation, it's best to call the quick load function from async void Start() with a 100ms delay to ensure that all data is initialised.
5. Setting Up the Save Indicator
The Bench Save System includes a save indicator UI element which provides visual feedback for the player whenever a save is in progress. This is useful for both developers and players to know that a game is actively saving data, it's especially useful for async saves or longer saves.
Firstly, in your main gameplay scene, drag the Default Indicator prefab into your canvas if you already have one. If you do not have a canvas yet simply create a new one by right-clicking your Hierarchy, hovering over UI and then clicking on Canvas.

The prefab contains a UI icon that will appear whenever a save occurs. This is how it looks like by default:

Next, locate the SaveIndicator script and attach it to Default Indicator prefab if it's not already attached. The script references the indicator to toggle on and off and animates the icon when a save is in progress.
The save system automatically calls SaveIndicator.Toggle(true) when a save begins and SaveIndicator.Toggle(false) when it ends. No additional scripting is required as long as the prefab is in your scene and the Target is assigned correctly.

The SaveIndicator component allows for optional customisation where you can change the icon, animation settings and sprites to fit your game's aesthetics.
Whenever a save occurs, whether it's called from QuickSave(), SaveGame() or SaveGameAsync(), the indicator will appear, providing developers and players with immediate feedback that game data is currently being saved.
6. Configuring Settings and Debugging
There are some universal settings for the asset that you can tweak by going to Window → Terresquall → Bench Universal Save System. The asset will create a ScriptableObject in your project that contains the save settings.

To help in viewing your saved data, you can access the Settings or the Bench Save System window and use the UI there to browse the data present in your save slots by clicking on View Save Data. This allows you to view all the variables and its values that you have saved which are categorised by their SaveID.
Here is an example of what you would be able to see when you choose to view a specified save slot's data:

To check the variables and values saved during gameplay testing, look out for a debug message "Quick save on slot [n]. Added data for the following:", this should show the most recent saved data and its variable names grouped by the script it was saved from.
To check if data was successfully loaded, look out for the debug message "Quick load on slot [n]. The following data was loaded:" with the same data shown in the save data debug message.
7. Credits
Developed by Terresquall.
Part of the Metroidvania tutorial series and maintained as a standalone asset for the Unity community.